Welcome to the Fydelia Support Hub
-
Getting Started
- Adding a new client account
- Adding another account user
- Age-based marketing redirects
- Changing a static background
- Connecting your Access Point with a PoE Power Injector
- Creating a UniFiOS admin user for external captive portal
- Custom domains and white labelling
- DOB Redirect - landing page based on visitors' age
- Downloading your invoices
- Enabling Fydelia Presence Analytics on Cisco Meraki
- FB pixel for Fydelia
- Finding and editing your splash page
- Generating free voucher codes
- Getting started as a reseller
- Hotel WiFi Features
- How to add a background slider with zoom effect to your guest WiFi splash page
- How to change the redirect URL after successful login
- How to enable automatic email validation
- How to play a video Ad before guest WiFi users can sign on
- Instant provision of a new account
- iPhone QR scanning won't redirect to captive portal
- Key Announcement for UniFi API Users: MFA - Multi Factor Authentication with Ubiquiti UniFi in July 2024
- Logging in to your account
- Managing your clients with sub-accounts
- Managing your subscription
- Piggy integration with Fydelia WiFi
- Purchasing vouchers with WiFi Pass
- Real time analytics dashboard
- Reports
- Set VAT amount on your WiFi passes
- Simplifying Guest WiFi
- Starting a 14-day trial
- Switching accounts in Reseller mode
- The UniFi controller interface versions
- Use your WiFi for COVID-19 Track & Trace
- Using free vouchers in your Fydelia splash page
- Walled Garden and Firewall IP settings
- What is WiFi marketing?
- WiFi Pass overview
- Show Remaining Articles (24) Collapse Articles
-
- Age-based marketing redirects
- Custom domains and white labelling
- DOB Redirect - landing page based on visitors' age
- FB pixel for Fydelia
- Hotel WiFi Features
- How to enable automatic email validation
- Purchasing vouchers with WiFi Pass
- Real time analytics dashboard
- Reports
- Test article
- Use your WiFi for COVID-19 Track & Trace
- WiFi Pass overview
-
- Adding a certificate to a Fortigate Captive portal to prevent browser errors
- Age-based marketing redirects
- Changing a static background
- Connecting your Access Point with a PoE Power Injector
- Creating a UniFiOS admin user for external captive portal
- Enabling Fydelia Presence Analytics on Cisco Meraki
- Finding and editing your splash page
- How to add a background slider with zoom effect to your guest WiFi splash page
- How to add an Account user to your Account
- How to block a compromised Amazon Firestick
- How to change the redirect URL after successful login
- How to Download the Visitor Reports
- iPhone QR scanning won't redirect to captive portal
- Key Announcement for UniFi API Users: MFA - Multi Factor Authentication with Ubiquiti UniFi in July 2024
- Logging in to your account
- Piggy integration with Fydelia WiFi
- Reserved classes
- The UniFi controller interface versions
- Walled Garden and Firewall IP settings
- Show Remaining Articles (4) Collapse Articles
-
Hardware and Networks
- Accessing your Fydelia dashboard
- Aerohive
- Applying an SSL Certiificate to your MikroTik HotSpot
- Aruba - built in controller
- Aruba InstantOn
- Cambium - Setup guide
- Cisco Meraki
- Cisco Mobility Express
- Configuring your UniFi controller to redirect guests to Fydelia splash pages
- Configuring your UniFi Splash page
- Connecting your UniFi Access Point
- Creating a FortiNet External Captive Portal
- Creating a Fydelia captive HotSpot portal on a MikroTik RouterBoard
- Creating a MikroTik Hotspot on a VLAN
- Creating a UniFiOS admin user for external captive portal
- Creating an EnGenius splash page
- Datto OpenMesh Setup Guide
- DrayTek Vigor 28xx
- Enabling an External Captive Portal with Ruckus ONE
- External Captive Portal with Alta Labs
- External Captive Portal with TPLink OMADA
- External Captive portal with Zyxel Nebula
- Getting Fydelia connected to your network
- Guest Email validation with MikroTik
- Guest internet Voucher coupon generation on MikroTik
- Guest WiFi EnGenius Cloud setup
- How to redirect D-Link Nuclias guests to a Fydelia external captive portal
- IgniteNet ecCloud External Captive Portal setup
- Migrating UniFi APs to another controller
- Remote access to Mikrotik
- Ruckus - SmartZone Setup Guide
- Ruckus - ZoneDirector Setup Guide
- Ruckus Unleashed External Captive Portal setup
- Setting up voucher pages with Plasma Cloud
- SonicWall - Setup guide
- Step by Step : Connecting a UniFi Access Point
- UniFi Hotspot Manager
- UniFi issue with iPhones - won't redirect to the captive portal
- UniFi known issue: Problems connecting with Laptops
- UniFi Version 6 and earlier - captive portal setup
- UniFi Version 7.x captive portal setup
- UniFiOS captive portal splash page setup
- Walled Garden and Firewall IP settings
- What is PoE?
- Show Remaining Articles (29) Collapse Articles
-
- Accessing UDM Pro directly from the WAN
- Configuring your UniFi controller to redirect guests to Fydelia splash pages
- Configuring your UniFi Splash page
- Connecting your UniFi Access Point
- Creating a UniFiOS admin user for external captive portal
- Key Announcement for UniFi API Users: MFA - Multi Factor Authentication with Ubiquiti UniFi in July 2024
- Migrating UniFi APs to another controller
- Step by Step : Connecting a UniFi Access Point
- The UniFi controller interface versions
- UniFi Hotspot Manager
- UniFi issue with iPhones - won't redirect to the captive portal
- UniFi known issue: Problems connecting with Laptops
- UniFi Version 6 and earlier - captive portal setup
- UniFi Version 7.x captive portal setup
- UniFiOS captive portal splash page setup
-
Integrations
- Build your DotMailer marketing database using WiFI
- Integrating with your TalkBox account
- Piggy integration with Fydelia WiFi
- Send customer WiFi data in real time to your MailChimp email marketing platform
- Send Guest WiFi data to your Campaign Monitor list
- Send guest WiFi data to your SproutSend marketing platform
- Toggle by Airship
- WiFi integration with Klaviyo CRM
- Zapier Integration Overview
-
- Build your DotMailer marketing database using WiFI
- Integrating with your TalkBox account
- Piggy integration with Fydelia WiFi
- Send customer WiFi data in real time to your MailChimp email marketing platform
- Send Guest WiFi data to your Campaign Monitor list
- Send Guest WiFi data to your Constant Contact lists
- Send guest WiFi data to your SproutSend marketing platform
- Toggle by Airship
- WiFi integration with Klaviyo CRM
- Zapier Integration Overview
Print
External Captive Portal with Alta Labs

Getting set up with AltaLabs is one of the simplest approaches out there. Just follow these few steps to get up and running:
- Login to your Alta Labs account
- Portal: https://manage.alta.inc
- user: my email
- pass: my password
Alta Portal settings
- Go to settings, Add new:
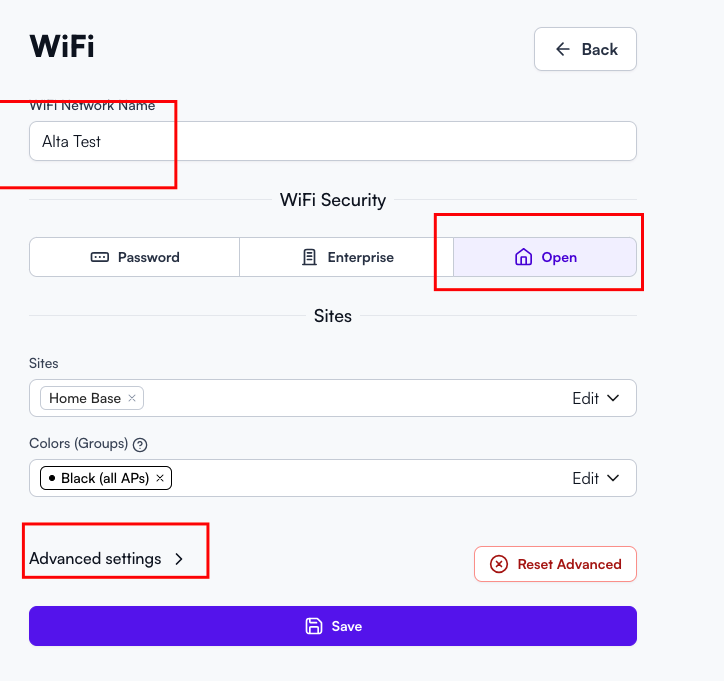
- Choose Network Type
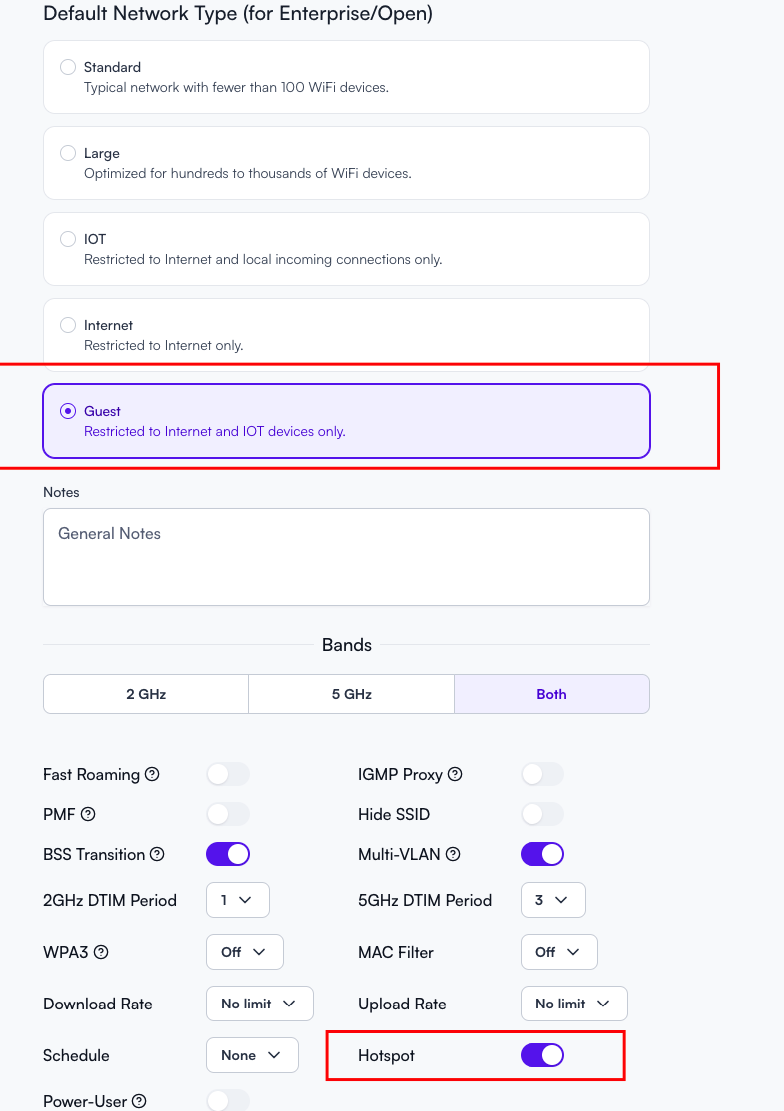
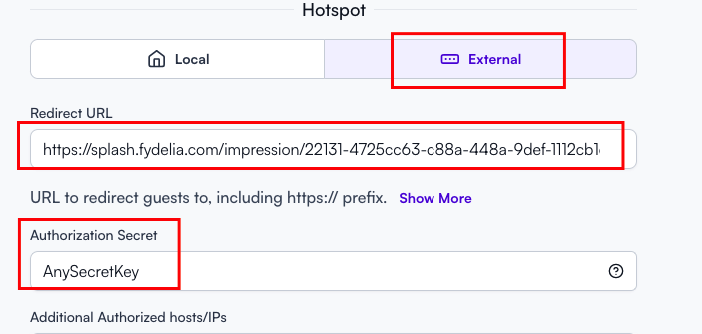
In the Hotspot section:
- Add a Redirect URL (the one in the image is just for demo purposes)
- Authorization Secret
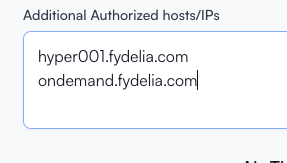
Add Additional Authorized Hosts/IPs:
Fydelia Portal/Splash page setup
Login to your Fydelia Portal account:
- Portal: https://ondemand.fydelia.com/portal/
- user: my email
- pass: my password
Go to:

Add Entry and select Alta from the drop-down:

Enter the details:

- Enter Unique Name – Enter any name or a Venue name
- Alta Secret – You will get it from your Alta account (screenshot above in the HotSpot Section)
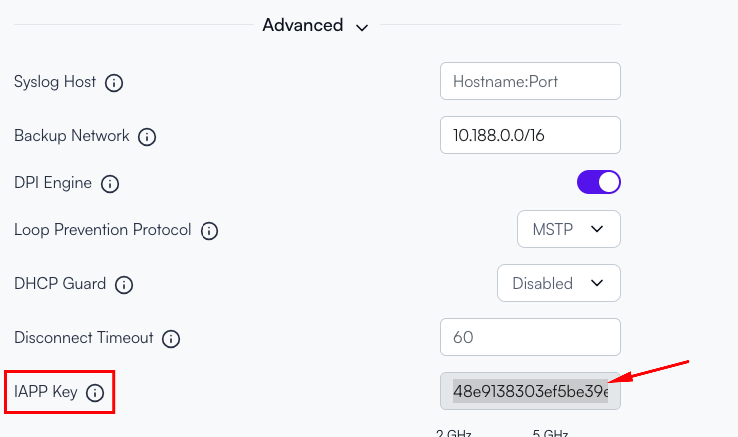
- Alta IAPP Key – You will get it from your Alta account (next screenshot)
- Alta Session – 1440 minutes equals 1 day
Click “Save Provider”
Obtaining the IAPP Key

Fydelia Splash page setup
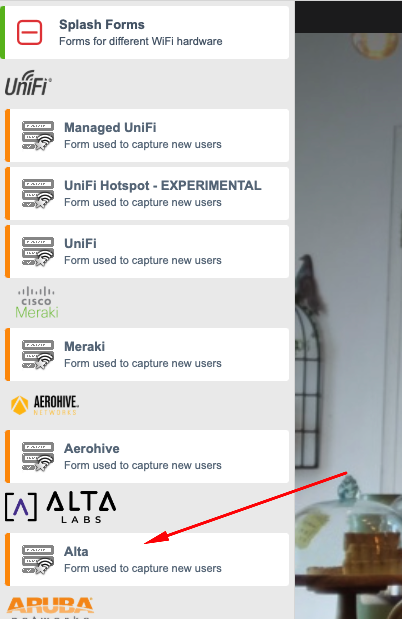
- Click on the edit option

- From the left side menu choose Alta Form and Drag-Drop it on the Splash page
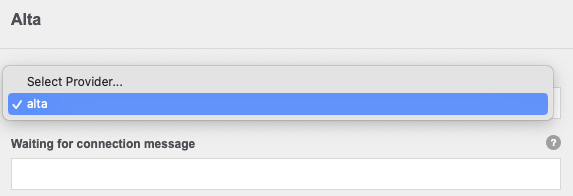
- Edit the Form and choose Alta from the Dropdown

- Don’t forget to SAVE and PUBLISH
You have now successfully set up an external captive portal.
Table of Contents